This is the documentation for ConfiForms Server/Data Center app
However, this might also work for ConfiForms cloud and in most cases it does. But please see this page to understand the differences between server and cloud versions of the ConfiForms app.
In this tutorial, you will learn how to create a requirement submission form with ConfiForms add-on and further process the collected information with Table Filter and Charts add-on.
As a product owner, you can use this tutorial to quickly collect requirements from stakeholders and then analyze them in Confluence.
The tutorial will include the following steps:
- creation of the requirement submission form
- collection of data
- filtration of collected requirements
- aggregation of collected requirements against specific criteria
- visualization of collected requirements with dynamical charts
In order to perform data filtration, aggregation, and visualization, you need to install Table Filter and Charts add-on.
Creation of the requirement submission form
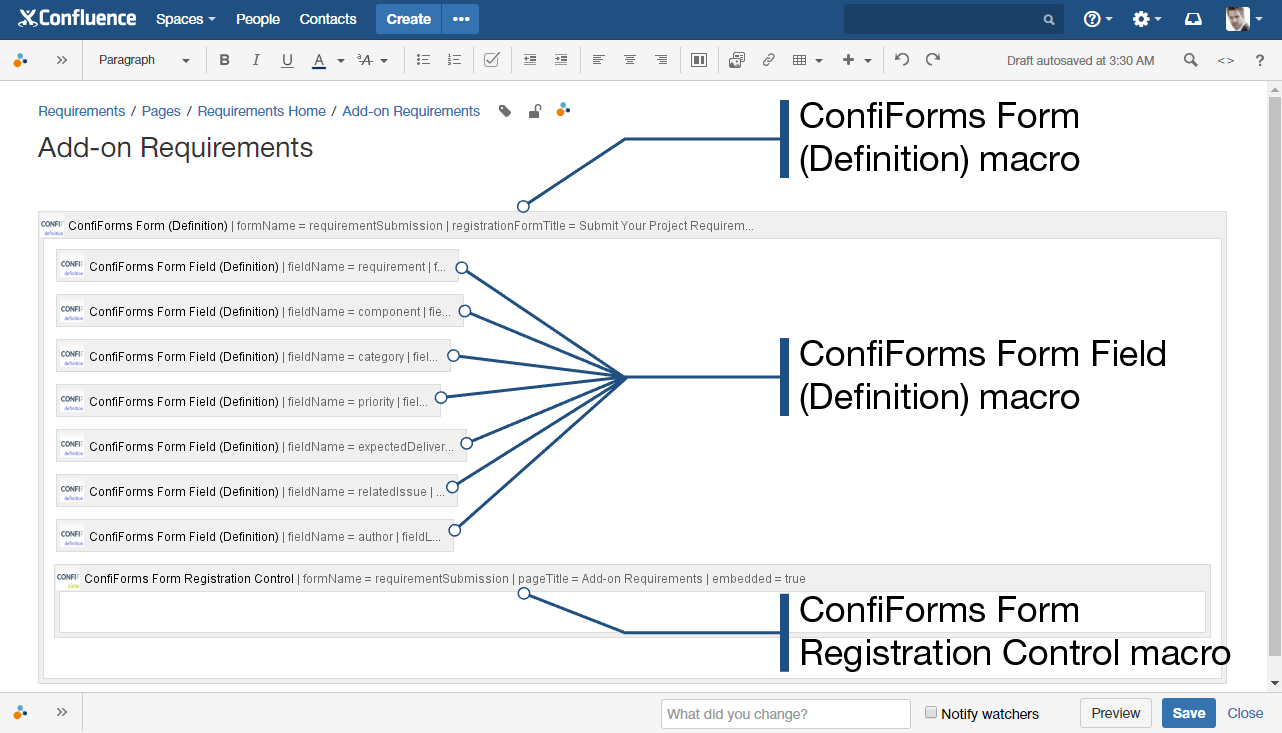
1. We start with a creation of the requirement submission form. We create a new page and insert the ConfiForms Form (Definition) macro here.
2. While editing this macro, specify the form name as 'requirementSubmission' and set its title. After this save the macro.
3. Within the ConfiForms Form (Definition) macro, add the seven ConfiForms Form Field (Definition) macros with the settings as follows:
| Field Name | Field Label | Required | Field Type | Field Description | Values | Notes | |
|---|---|---|---|---|---|---|---|
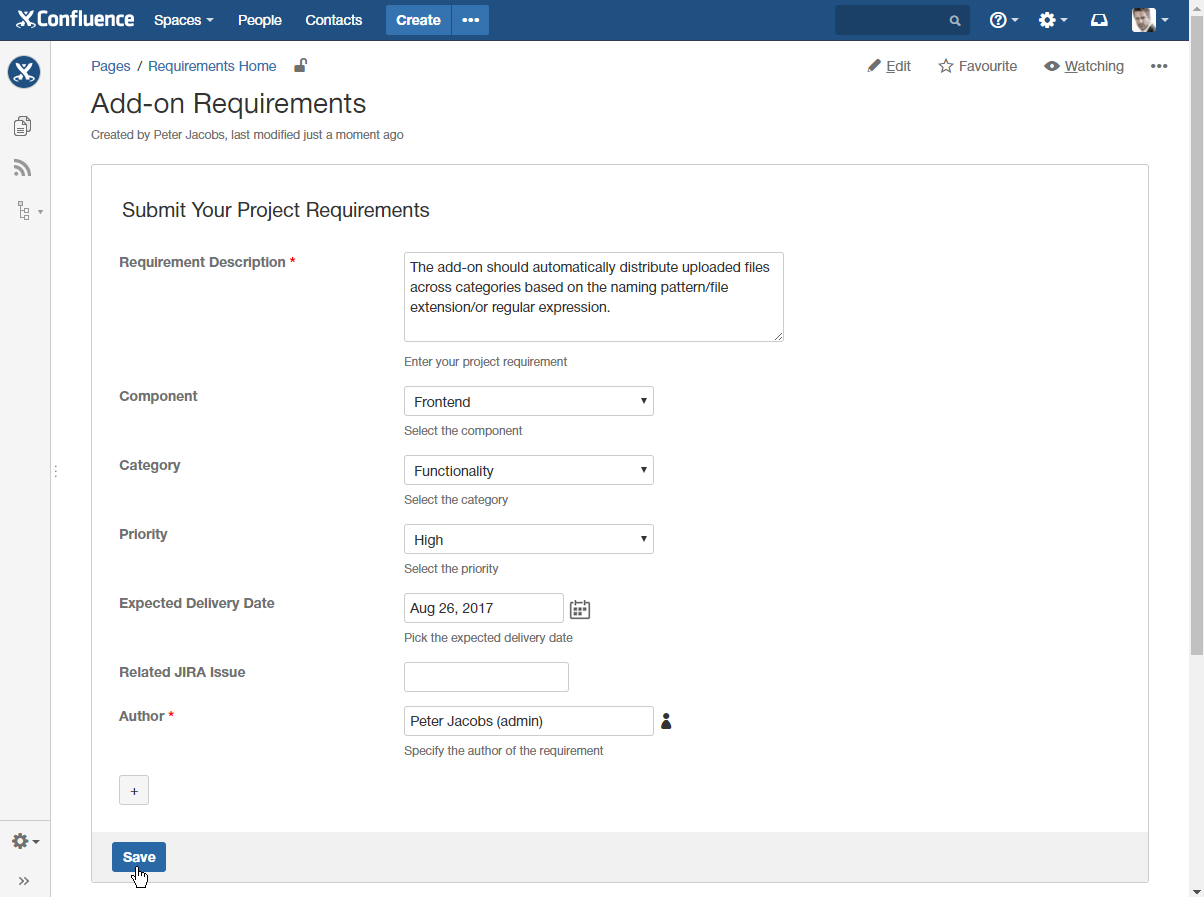
| 1 | requirement | Requirement Description | Yes | Textarea | Enter your project requirement | None | |
| 2 | component | Component | No | Dropdown | Select the component |
| |
| 3 | category | Category | No | Dropdown | Select the category |
| |
| 4 | priority | Priority | No | Dropdown | Select the priority |
| |
| 5 | expectedDeliveryDate | Expected Delivery Date | No | Date | Pick the expected delivery date | Dates in the MMM dd, yyyy format. | |
| 6 | relatedIssue | Related JIRA Issue | No | JIRA Issue | Link the requirement to JIRA issue. | Requires the configured application link to JIRA. | |
| 7 | author | Author | Yes | User | Specify the author of the requirement |
4. Finally, insert the ConfiForms Form Registration Control macro. This macro will register the submitted requirements. While configuring it, you need to enter the form name 'requirementSubmission' and name of the page where it locates.
5. After all manipulations you should have something like this:
6. Save the page.
7. Share the page with stakeholders.
Collection of project requirements
1. Create a new page.
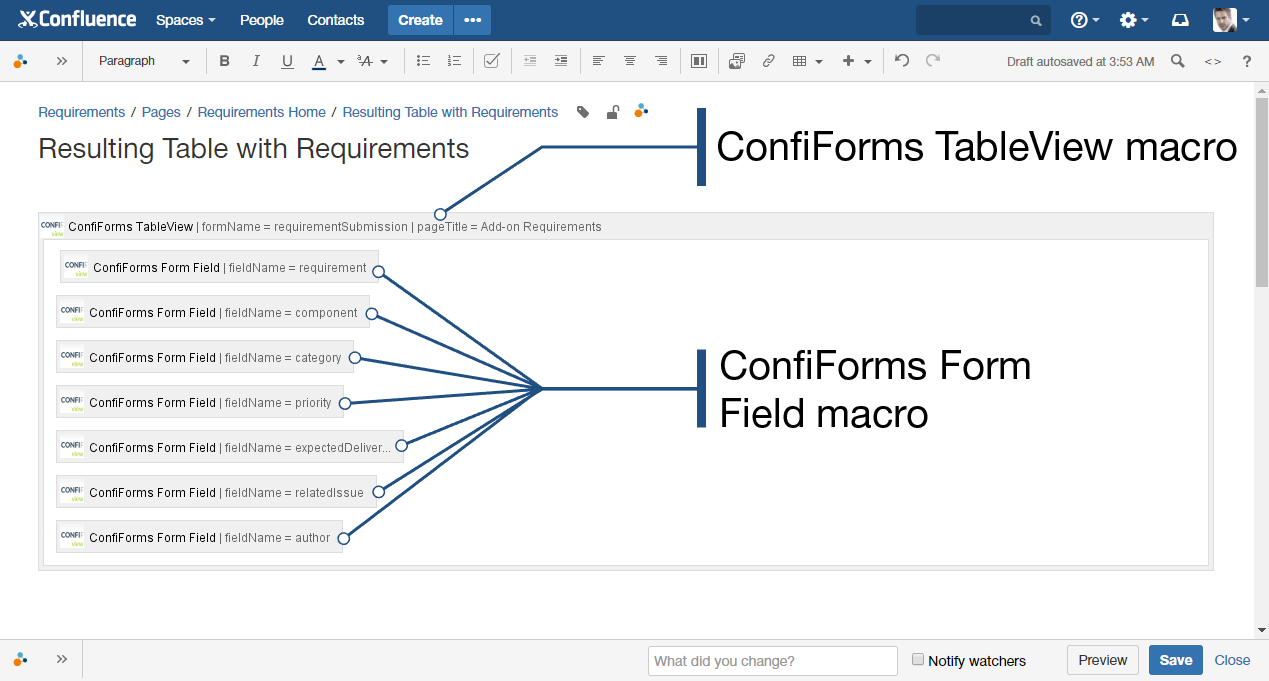
2. Insert the ConfiForms TableView macro. Specify the form name 'requirementSubmission' and the page where it is stored for pulling the collected data from.
3. Insert the ConfiForms Form Field macro for each data entry field available on the requirement submission form.
4. Finally, you should have something like this:
5. Save the page. As the result you will get a table with all requirements collected from stakeholders.
Filtration of project requirements
For filtering the table with collected requirements we will use the Table Filter macro from Table Filter and Charts add-on.
1. Edit the page with the ConfiForms TableView macro.
2. Insert the Table Filter macro by entering {Table Filter}.
3. Place the ConfiFormsTable View macro within the Table Filter macro and save the page.
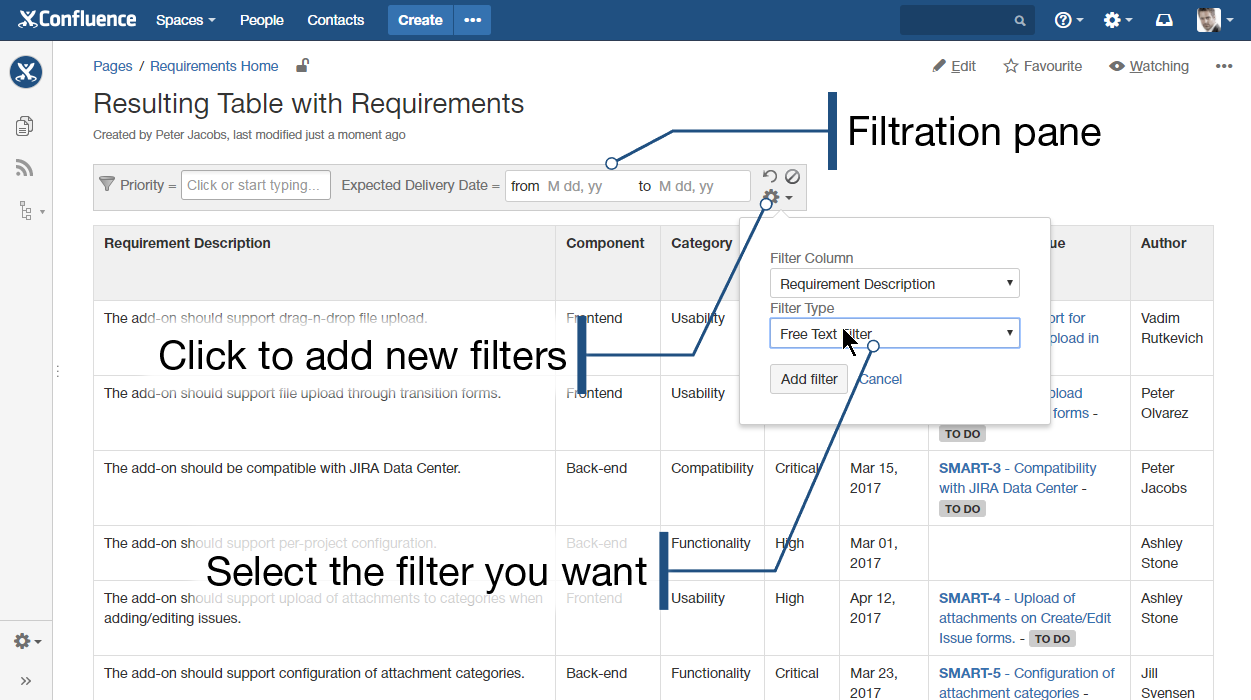
4.On the filtration pane, click the cogwheel icon, and then select Add filter.
5. Add the following filter types:
- a dropdown filter for the Priority column
- a date filter for the Expected Delivery Date column
- a free text filter for the Requirement Description column
6. Click the cogwheel icon, and then select Modify settings. Set the correct date format as 'M dd, yy'
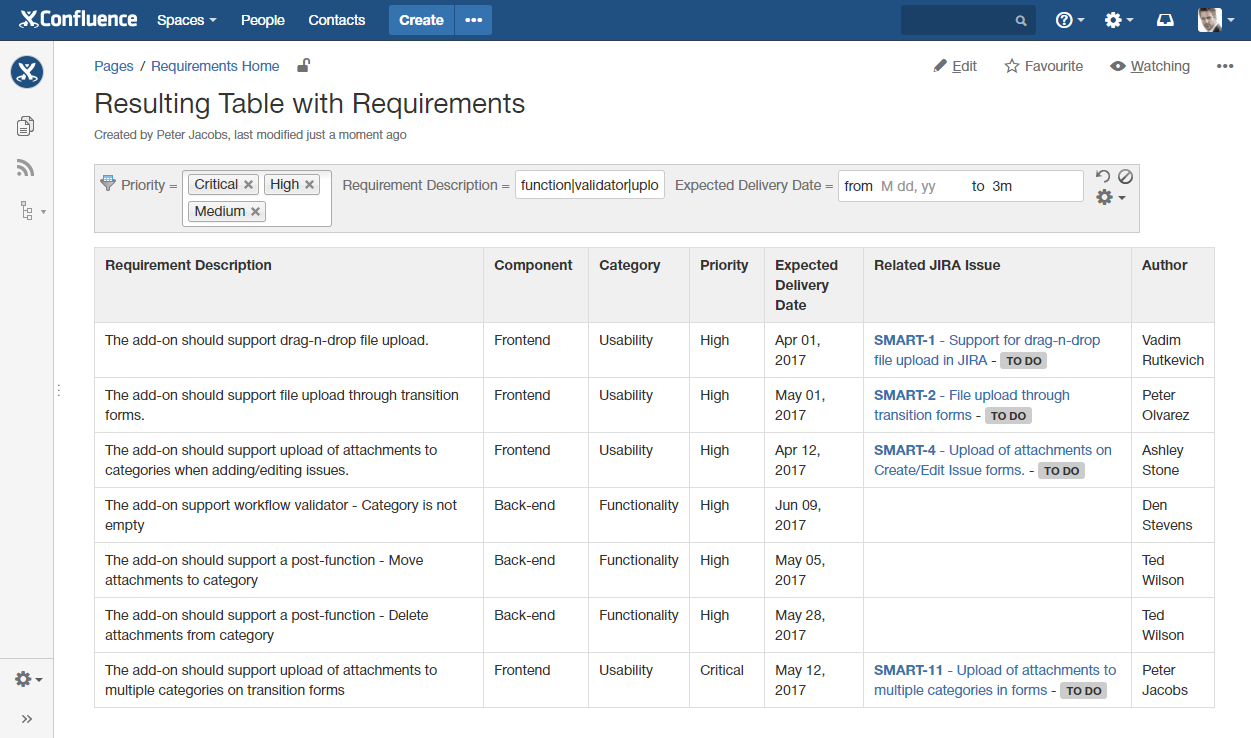
7. Proceed to table data filtration, as follows:
- filter requirements by priority (Critical, High, and Medium);
- enter the regular expression 'function|validator|upload' to look up for requirements containing any of these words;
- filter requirements which delivery date is expected in the nearest 3 month by entering the dynamic time query '3m'.
Aggregation of requirements against specific criteria
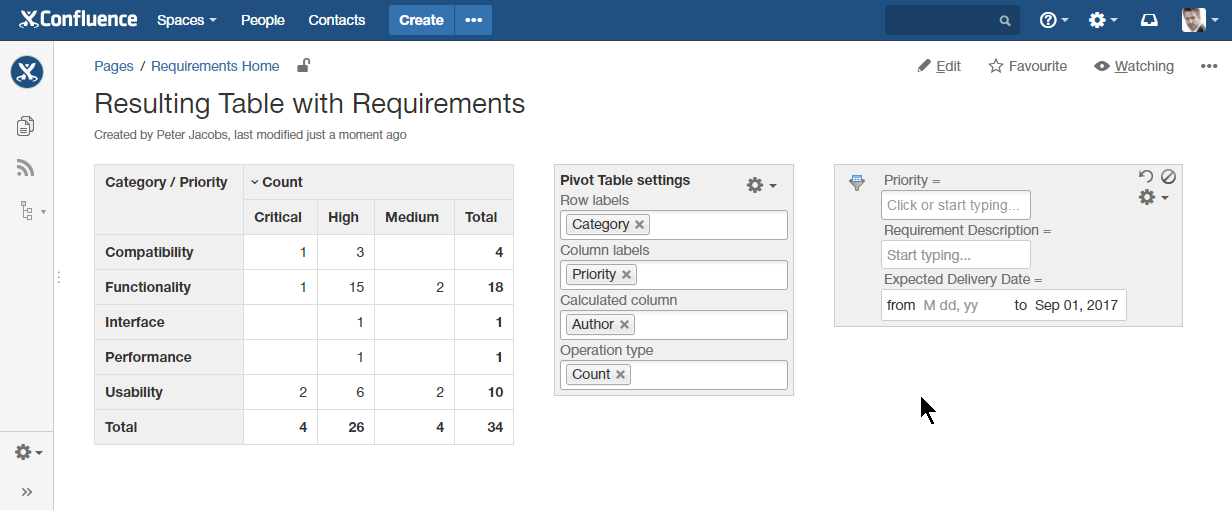
For filtering the table with collected requirements we will use the Pivot Table macro from Table Filter and Charts add-on. It allows you to create multi-dimensional pivot tables for summarizing table data in Confluence.
1. Edit the page with the ConfiForms TableView macro.
2. Insert the Pivot Table macro by entering {Pivot Table}.
3. Place the macro structure within the Pivot Table macro and save the page.
4. On the pivot table management pane, select the appropriate columns of the source table for the Column and Row labels of the resulting pivot table.
5. You can apply some filtration criteria to get the refined results.
Visualization of table with aggregated project requirements
For visualizing the table with aggregated data we will use the Chart from Table macro from Table Filter and Charts add-on.
1. Edit the page with the ConfiForms TableView macro.
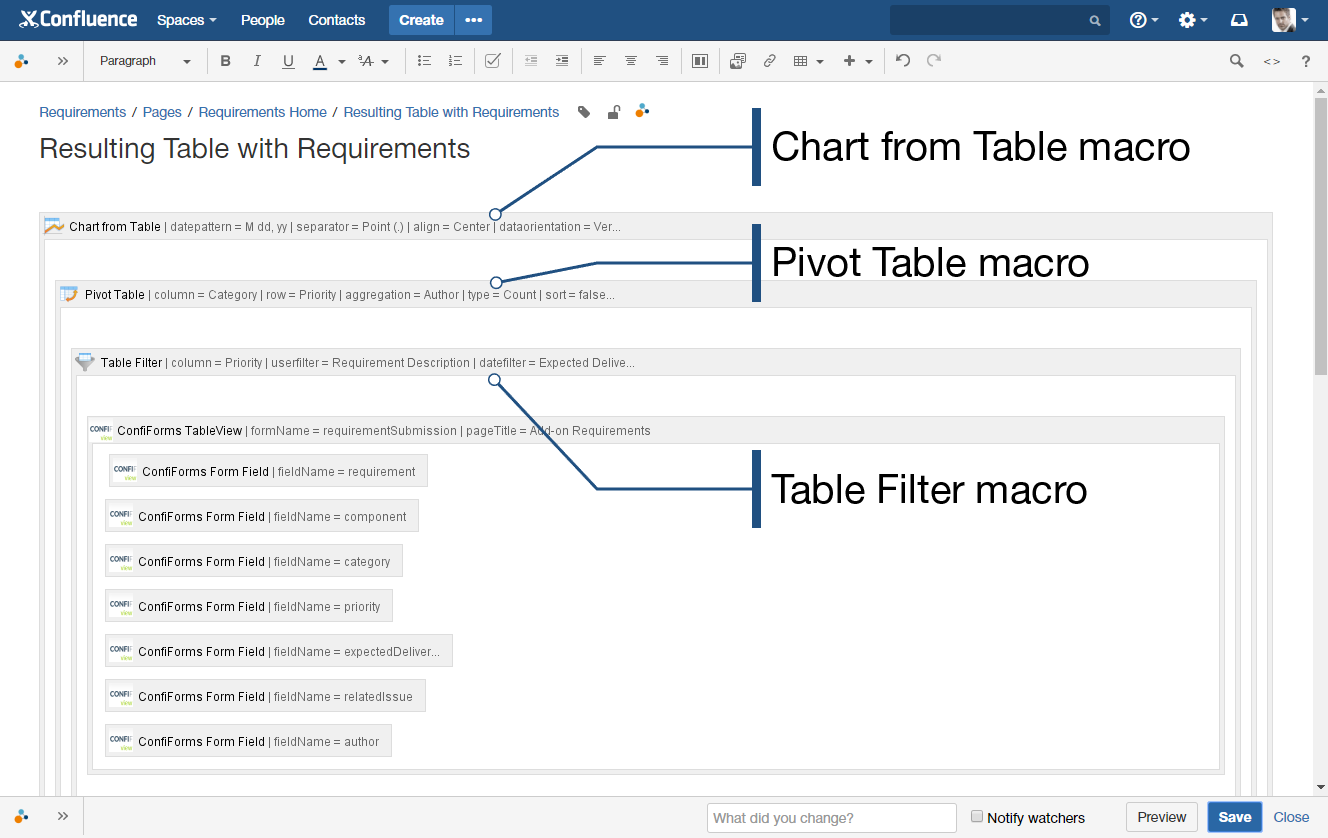
2. Insert the Chart from Table macro by entering {Chart from Table}. Move the whole macro structure within it. Finally, it should look like this:
3. Save the page.
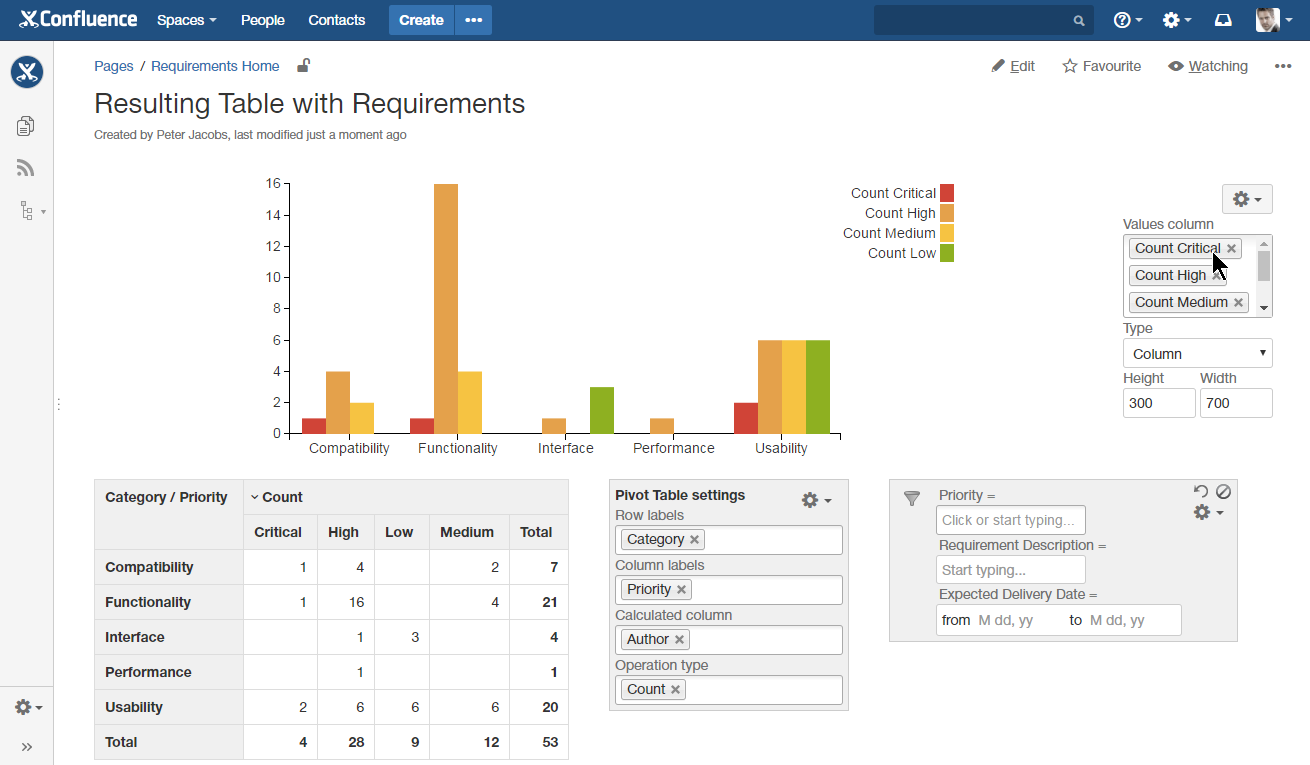
4. Select chart type as 'Column'.
5. Select the columns with numeric values for chart generation.
6. Regulate the dimensions of the chart by entering the appropriate width and height of the chart.
7. Filter the source table by some criteria and get the dynamically update pivot table and the chart generate on its basis.
Have a look at the video tutorial provided by our friends at StiltSoft, the authors of a great add-on called Table Filter and Charts for Confluence
